


Cerealis
Poor maintenance or maintenance focussed in the wrong areas can ultimately cause an unexpected or early failure of a product. On planters, other than just causing a failure, not doing maintenance can cause extreme yield losses as well as negatively affect the benefits of the technology producers invest in to ensure that they plant correctly. Often these maintenance issues are relatively easy and budget-friendly to fix, but are overlooked for various reasons.
A planter is made up mainly of moving components which are exposed (in season and out of season) to some of the harshest conditions. Often a rusted shaft or wobbly cutting coulter can draw attention away from the finer more serious maintenance points. One of the easiest tests or trials to do in practice is a flag test (Photo 1).
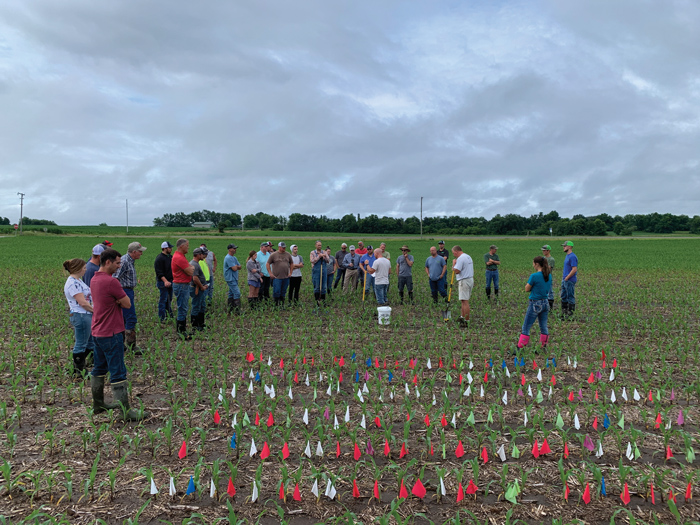
A flag test is where plants are marked with different colour flags as they emerge and then the cob weights at the different times of emergence are recorded. What the test generally reveals is 0,5% yield loss per hour. Once a late-emerging plant is a full leaf stage behind, it equates to 50% yield loss and anything after that is basically an expensive weed.
Discussed below are the three most overlooked but also most important maintenance areas on planters that can cause poor germination and an uneven emergence.
Seed disc spacing
On the majority of planter brands a system of two seed discs touching each other is used to open the furrow in the soil where the seed is then placed. The relation between these two discs is extremely important to ensure a clean, uniform V-shaped furrow to place the seed into. When seed disc spacing is not correct and dirt is able to move between the seed discs, a few issues are caused:
- A W instead of a V is created, which means the seed then lands at an uneven height and because it is not sitting in the centre of a clean uniform furrow, it also makes closing the furrow and
ensuring good seed to soil contact difficult. This is not good for germination. - A gap between the seed discs allows for dry surface dirt to fall into the furrow and make contact with the seed.
- Dirt moving between the seed discs can often also be the cause of seed discs jamming when the moisture level picks up a bit.
Incorrect seed disc contact can be caused by the following:
- The bearing hole on a seed disc was not punched centre at the factory.
- A seed disc is not perfectly flat from the factory.
- Seed discs wearing over time.
- Worn bearings and worn shafts.
- Incorrectly shimmed discs.
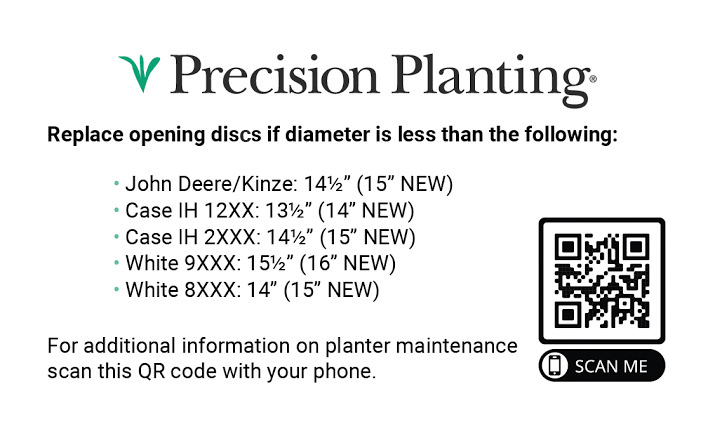
To correct this issue, first check that the seed discs are not damaged or worn out of spec (different planters have different minimum measurements on seed discs – see Photo 2). Then check that the seed discs, bearings and shafts are not worn or damaged. If new discs must be ordered, check that all the discs are straight and that the holes are centre to the discs. Only then the discs can be shimmed. To do this, use two standard business cards (Photo 3).
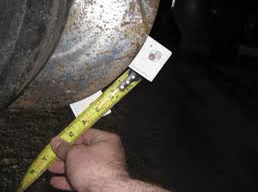
Insert one card at the top of where the two discs make contact and one at the bottom, just light enough for the contact point to hold the cards. Then measure the distance between the two cards. The aim is to achieve 6 cm contact between the cards. If the gap between the cards is too small, remove shims and if it is too big, add shims to ensure 6 cm of contact.
Depth gauge wheel spacing in relation to the seed discs
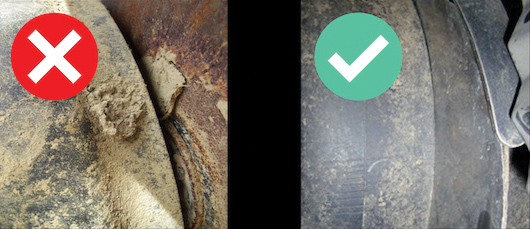
This is often a much-debated topic regarding what type of depth gauge wheel is best (close to the seed disc or far away from the seed disc). The most common is a depth gauge wheel that makes light contact with the seed disc. When there is a gap – big or small – between the gauge wheels, it allows for dry dirt to make its way between the disc and gauge wheel causing a ‘rooster tail’ effect of dry dirt in the rim or lip of the gauge wheels. This dirt then flicks up from the gauge wheels and lands in the furrow contacting the seed, causing germination problems (Figure 1).
As the planter wears – or even on a new planter – the spacing between gauge wheels and seed discs can change. Reasons include the following:
- The gauge wheel arm mouldings/fabrication on the new planter is slightly out.
- Rubber tyres are worn.
- The gauge wheel arms are bent.
- The bearing/shaft is worn.
To ensure the correct gauge wheel spacing, check that the arms aren’t bent, the tyres aren’t worn past their respective wear marks and the bearings are still in good condition. Then lift the planter, place blocks under the gauge wheels and lower the planter back down onto the gauge wheel blocks. Then use the respective planter’s type of adjustment to adjust the gauge wheels to where the gauge wheel is making light contact with the seed disc at ground-engaging height, but is also still able to rotate.
Zeroing the depth setting on a planter
All the different planter brands have different depth-setting systems. However, all of them follow the same principles and unfortunately all of them have similar shortfalls and points of wear. On average, the depth system is made up of four or five components, which allow producers to control and alter the height which the gauge wheels can travel upwards. In turn, this can cause the seed discs to move downwards into the soil, creating a furrow for the seed at the depth that was set using the allocated marks on the row unit. Unfortunately, all these components are susceptible to wear or on a new planter, can be caused by non-uniform fabrication which will alter the actual seeding depth in relation to the depth mark that was chosen.
Unfortunately, due to the rush and chaos of planting season, a planter is often pulled into the land and then stopped after a 100 m or so. Two or three rows are then checked for seed depth and all the row units are adjusted accordingly. However, since not all of them are worn or fabricated in exactly the same way, some row units will be caused to plant at different depths to the others and not the desired depth that it was set on.
Earlier, the flag test and losses involved with uneven emergence were explained. Uneven planting depth is a direct cause of uneven emergence. So, if there is a variance of 1 cm to 2 cm (even on a brand-new planter) from one row unit to another, it is safe to say that the particular row unit has the potential to cause at least a 12% yield loss. When it is worked out what tonnage that specific row unit is expected to bring in, 12% becomes a substantial loss. So, remember that the correction costs nothing and actually takes very little time to complete.
How to zero a planter’s planting depth
Use a 2 inch x 4 inch beam (because most planter manuals will have a 2 inch setting position). Then cut the beam into lengths of 30 cm – two lengths per row are needed (try to do three rows at a time). Set the row units on their ‘2 inch’ setting and then slide the beams under the gauge wheels and lower the planter units onto them (Photo 4).
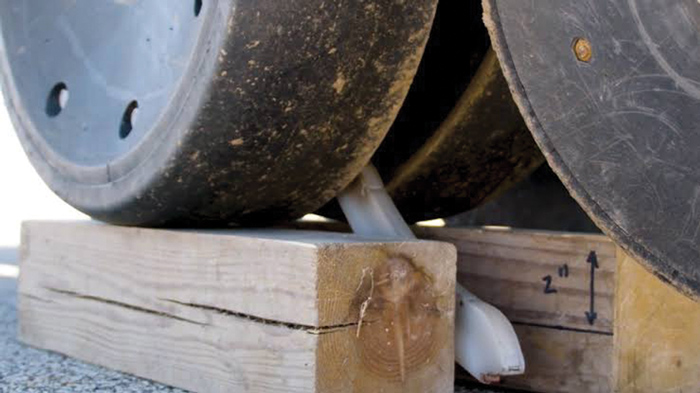
Confirm that the parallel arms are level and that the lock-out bar has full ‘tight’ contact from the gauge wheel arms and that the seed discs are contacting the floor. If the lock-out bar is not tight or has any play, adjust the depth handle up until it takes up the slack. If the seed discs are not touching the ground, adjust the depth down till the seed discs contact the floor while still maintaining ‘lock out’ on the lock-out bar. Keep adjusting the units until there is full lock out and the seed discs are contacting the ground.
This then becomes the ‘zero’ depth position on the planter. One row unit’s depth setting position will be different to another. Make some form of mark using a paint pen or marker on the depth lever. When one now goes into the land and see that the seeding depth needs to be adjusted down or up, those adjustments can be made per row unit from the ‘zero’ mark, ensuring that the desired depth is obtained when ground contact is maintained. A row unit like the Precision Planting Row unit has a brilliant feature where it allows one to reset the depth using a nut system on the lock-out pin. This means one doesn’t have to continuously mark or make note of where the zero/even-depth position is and can ensure one is always planting at an even depth across the planter.
Like anything in life, ensuring a correctly built foundation and due diligence to the fine-tuning and basics of a machine, can have major impacts on the future return on investment values that are upgraded and built onto planting systems.


